MyBatis-Plus
**2023/01/01 - **
MyBatis-Plus 开发文档 https://baomidou.com/
MyBatis-Plus 简介 MyBatis-Plus (opens new window) (简称 MP)是一个 MyBatis (opens new window) 的增强工具,在 MyBatis 的基础上只做增强不做改变,为简化开发、提高效率而生。
特性
无侵入 :只做增强不做改变,引入它不会对现有工程产生影响,如丝般顺滑损耗小 :启动即会自动注入基本 CURD,性能基本无损耗,直接面向对象操作强大的 CRUD 操作 :内置通用 Mapper、通用 Service ,仅仅通过少量配置即可实现单表大部分 CRUD 操作,更有强大的条件构造器,满足各类使用需求支持 Lambda 形式调用 :通过 Lambda 表达式 ,方便的编写各类查询条件,无需再担心字段写错支持主键自动生成 :支持多达 4 种主键策略(内含分布式唯一 ID 生成器 - Sequence),可自由配置,完美解决主键问题支持 ActiveRecord 模式 :支持 ActiveRecord 形式调用,实体类只需继承 Model 类即可进行强大的 CRUD 操作支持自定义全局通用操作 :支持全局通用方法注入( Write once, use anywhere )内置代码生成器 :采用代码或者 Maven 插件可快速生成 Mapper 、 Model 、 Service 、 Controller 层代码,支持模板引擎,更有超多自定义配置等您来使用内置分页插件 :基于 MyBatis 物理分页,开发者无需关心具体操作,配置好插件之后,写分页等同于普通 List 查询分页插件支持多种数据库 :支持 MySQL、MariaDB、Oracle、DB2、H2、HSQL、SQLite、Postgre、SQLServer 等多种数据库内置性能分析插件 :可输出 SQL 语句以及其执行时间,建议开发测试时启用该功能,能快速揪出慢查询内置全局拦截插件 :提供全表 delete 、 update 操作智能分析阻断,也可自定义拦截规则,预防误操作
支持数据库
任何能使用 MyBatis 进行 CRUD ,并且支持标准 SQL 的数据库,具体支持如下。如果不在下列表查看分页部分教程 PR 所用的支持
MySQL,Oracle,DB2,H2,HSQL,SQLite,PostgreSQL,SQLServer,Phoenix,Gauss ,ClickHouse,Sybase,OceanBase,Firebird,Cubrid,Goldilocks,csiidb,informix,TDengine,redshift
达梦数据库,虚谷数据库,人大金仓数据库,南大通用(华库)数据库,南大通用数据库,神通数据库,瀚高数据库,优炫数据库
架构结构 代码文档及文档地址 官方地址: http://mp.baomidou.com
代码发布地址:
Github: https://github.com/baomidou/mybatis-plus
Gitee: https://gitee.com/baomidou/mybatis-plus
文档发布地址: https://baomidou.com/pages/24112f
MyBatis-Plus 入门案例 开发环境 IDE :IDEA 2021.03
JDK : 17
构建工具 : maven 3.8.1
MySQL : 8.0.31
MyBatis-Plus :3.5.4
系统 : win 10 x64
创建数据库及表 创建表 1 2 3 4 5 CREATE DATABASE `mybatis_plus` ;use `mybatis_plus`; CREATE TABLE `user ` (`id` bigint (20 ) NOT NULL COMMENT '主键ID' , `name` varchar (30 ) DEFAULT NULL COMMENT '姓名' , `age` int (11 ) DEFAULT NULL COMMENT '年龄' , `email` varchar (50 ) DEFAULT NULL COMMENT '邮箱' , PRIMARY KEY (`id`) ) ENGINE= InnoDB DEFAULT CHARSET= utf8;
添加数据 1 2 3 4 5 6 INSERT INTO user (id, name, age, email) VALUES (1 , 'Jone' , 18 , 'test1@baomidou.com' ), (2 , 'Jack' , 20 , 'test2@baomidou.com' ), (3 , 'Tom' , 28 , 'test3@baomidou.com' ), (4 , 'Sandy' , 21 , 'test4@baomidou.com' ), (5 , 'Billie' , 24 , 'test5@baomidou.com' );
创建 SpringBoot 工程 初始化工程 使用 spring initializr
导入依赖 1 2 3 4 5 6 7 8 9 10 11 12 13 14 15 16 17 18 19 20 21 22 23 24 25 26 27 28 29 30 31 32 <dependencies > <dependency > <groupId > org.springframework.boot</groupId > <artifactId > spring-boot-starter</artifactId > </dependency > <dependency > <groupId > org.springframework.boot</groupId > <artifactId > spring-boot-starter-test</artifactId > <scope > test</scope > </dependency > <dependency > <groupId > com.baomidou</groupId > <artifactId > mybatis-plus-boot-starter</artifactId > <version > 3.5.1</version > </dependency > <dependency > <groupId > org.projectlombok</groupId > <artifactId > lombok</artifactId > <optional > true</optional > </dependency > <dependency > <groupId > mysql</groupId > <artifactId > mysql-connector-java</artifactId > </dependency > </dependencies >
lombok 简化开发 略
编写代码 配置 application.yaml 1 2 3 4 5 6 7 8 9 10 11 12 spring: datasource: type: driver-class-name: com.mysql.cj.jdbc.Driver url: jdbc:mysql://localhost:3306/mybatis_plus?serverTimezone=GMT%2B8&characterEncoding=utf-8&useSSL=false username: root password: C020611.
配置注意事项
配置驱动类 driver-class-name
springboot 2.0(内置 jdbc5驱动),驱动类使用
driver-class-name: com.mysql.jdbc.Driver
springboot 2.1 及以上(内置 jdbc8 驱动),驱动类使用
driver-class-name: com.mysql.cj.jdbc.Driver
否则运行测试用例的时候会有 WARN 信息
连接地址 URL
MySQL5.7版本的url:
jdbc:mysql://localhost:3306/mybatis_plus?characterEncoding=utf-8&useSSL=false
MySQL8.0版本的url:
jdbc:mysql://localhost:3306/mybatis_plus?serverTimezone=GMT%2B8&characterEncoding=utf-8&useSSL=false
否则 运行测试用例报告如下错误
java.sql.SQLException: The server time zone value 'ÖÐ1ú±ê×1⁄4ʱ1⁄4ä' is unrecognized or represents more
启动类 在 SpringBoot 启动类 中添加 @MapperScan 注解,扫描 mapper 包
1 2 3 4 5 6 7 8 9 @MapperScan("com.cs7eric.mybatisplus.mapper") @SpringBootApplication public class MybatisPlusApplication { public static void main (String[] args) { SpringApplication.run(MybatisPlusApplication.class, args); } }
添加实体 1 2 3 4 5 6 7 8 9 10 @Data @AllArgsConstructor @NoArgsConstructor public class User { private Long id; private String name; private Integer age; private String email; }
使用了 Lombok 注解
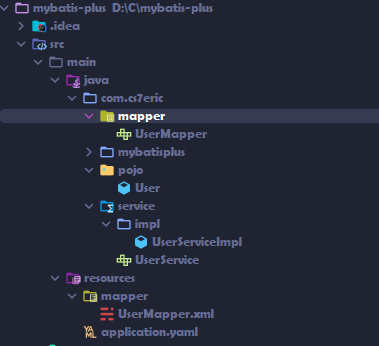
添加 mapper
BaseMapper 是 MyBatis-Plus 提供的模板 mapper ,其中包含了基本的 CRUD 方法,泛型为操作的实体类类型
1 2 public interface UserMapper extends BaseMapper <User> {}
测试 1 2 3 4 5 6 7 8 9 10 11 12 13 @SpringBootTest class MybatisplusApplicationTests { @Autowired private UserMapper userMapper; @Test public void testSelectList () { List<User> list = userMapper.selectList(null ); list.forEach(System.out::println); } }
注意:
IDEA 在 UserMapper 处报错,因为找不到 注入的对象,因为类是动态创建的,但是程序可以正确执行,为了避免报错,可以 mapper 接口处添加 @Repository
添加日志 在 application.yaml 中配置日志输出
1 2 3 4 mybatis-plus: configuration: log-impl: org.apache.ibatis.logging.stdout.StdOutImpl
MyBatis-Plus 使用
基本 CRUD BaseMapper MyBatis-Plus 中的基本CRUD 在内置的 BaseMapper 中已经得到了 实现,可以直接使用,接口如下:
1 public interface BaseMapper <T> extends Mapper <T> {
这个 Mapper 支持 泛型,泛型就是操作的 类型
Mapper 继承该接口后,无需编写 mapper.xml 文件,即可获得 CRUD 功能
1 2 3 4 5 6 7 8 9 10 11 12 13 14 15 16 17 18 19 20 21 22 23 24 25 26 27 28 29 30 31 32 33 34 35 36 37 38 39 40 41 42 43 44 45 46 47 48 49 50 51 52 53 54 55 56 57 58 59 60 61 62 63 64 65 66 67 68 69 70 71 72 73 74 75 76 77 78 79 80 81 82 83 84 85 86 87 88 89 90 91 92 93 94 95 96 97 98 99 100 101 102 103 104 105 106 107 108 109 110 111 112 113 114 115 116 117 118 119 120 121 122 123 124 125 126 127 128 129 130 131 132 133 134 135 136 137 138 139 140 141 142 143 144 145 146 147 148 149 150 151 152 153 154 155 156 157 158 159 160 161 162 163 164 165 166 167 168 169 170 171 172 173 174 175 176 177 178 179 180 181 182 183 184 185 186 187 188 189 190 191 192 193 194 195 196 197 198 199 200 201 202 203 204 205 206 207 208 209 210 211 212 213 214 215 216 217 218 219 220 221 222 223 224 225 226 227 228 229 230 231 232 233 234 235 236 237 238 package com.baomidou.mybatisplus.core.mapper;import com.baomidou.mybatisplus.core.conditions.Wrapper;import com.baomidou.mybatisplus.core.metadata.IPage;import com.baomidou.mybatisplus.core.toolkit.CollectionUtils;import com.baomidou.mybatisplus.core.toolkit.Constants;import com.baomidou.mybatisplus.core.toolkit.ExceptionUtils;import org.apache.ibatis.annotations.Param;import java.io.Serializable;import java.util.Collection;import java.util.List;import java.util.Map;public interface BaseMapper <T> extends Mapper <T> { int insert (T entity) ; int deleteById (Serializable id) ; int deleteById (T entity) ; int deleteByMap (@Param(Constants.COLUMN_MAP) Map<String, Object> columnMap) ; int delete (@Param(Constants.WRAPPER) Wrapper<T> queryWrapper) ; int deleteBatchIds (@Param(Constants.COLLECTION) Collection<?> idList) ; int updateById (@Param(Constants.ENTITY) T entity) ; int update (@Param(Constants.ENTITY) T entity, @Param(Constants.WRAPPER) Wrapper<T> updateWrapper) ; T selectById (Serializable id) ; List<T> selectBatchIds (@Param(Constants.COLLECTION) Collection<? extends Serializable> idList) ; List<T> selectByMap (@Param(Constants.COLUMN_MAP) Map<String, Object> columnMap) ; default T selectOne (@Param(Constants.WRAPPER) Wrapper<T> queryWrapper) { List<T> ts = this .selectList(queryWrapper); if (CollectionUtils.isNotEmpty(ts)) { if (ts.size() != 1 ) { throw ExceptionUtils.mpe("One record is expected, but the query result is multiple records" ); } return ts.get(0 ); } return null ; } default boolean exists (Wrapper<T> queryWrapper) { Long count = this .selectCount(queryWrapper); return null != count && count > 0 ; } Long selectCount (@Param(Constants.WRAPPER) Wrapper<T> queryWrapper) ; List<T> selectList (@Param(Constants.WRAPPER) Wrapper<T> queryWrapper) ; List<Map<String, Object>> selectMaps (@Param(Constants.WRAPPER) Wrapper<T> queryWrapper) ; List<Object> selectObjs (@Param(Constants.WRAPPER) Wrapper<T> queryWrapper) ; <P extends IPage <T>> P selectPage (P page, @Param(Constants.WRAPPER) Wrapper<T> queryWrapper) ; <P extends IPage <Map<String, Object>>> P selectMapsPage (P page, @Param(Constants.WRAPPER) Wrapper<T> queryWrapper) ; }
插入 1 2 3 4 5 6 7 8 9 10 11 12 13 14 @Test @DisplayName("testInsert") public void testInsert () { User user = new User (); user.setName("张三" ); user.setAge(12 ); user.setEmail("zhangsan@atguigu.com" ); int result = userMapper.insert(user); System.out.println(result); System.out.println("id = " + user.getId()); }
最终获得的 ID 为 1610518676744368130
这是因为 MyBatis-Plus 在实现插入数据时,会默认基于雪花算法的策略生成 ID
删除 根据 ID 查询 用户信息 1 2 3 4 5 6 7 8 9 10 @Test @DisplayName("testDeleteById") public void testDeleteById () { int result = userMapper.deleteById(1610518676744368130L ); System.out.println(result); }
根据 多个 ID 查询 多个用户信息 1 2 3 4 5 6 7 8 9 10 @Test @DisplayName("testDeleteBatchIds") public void testDeleteBatchIds () { List<Long> list = Arrays.asList(1L , 2L , 3L ); int result = userMapper.deleteBatchIds(list); System.out.println(result); }
根据 map 条件删除记录 1 2 3 4 5 6 7 8 9 10 11 12 @Test @DisplayName("testDeleteByMap") public void testDeleteByMap () { Map<String,Object> map = new HashMap <>(); map.put("age" ,23 ); map.put("name" ,"张三" ); int result = userMapper.deleteByMap(map); System.out.println(result); }
修改 1 2 3 4 5 6 7 8 9 10 11 12 @Test public void testUpdate () { User user = new User (); user.setIdƔL); user.setName("李四" ); user.setEmail("lisi@atguigu.com" ); userMapper.updateById(user); System.out.println("user = " + user); }
查询 根据 ID 查询用户信息 1 2 3 4 5 6 7 @Test @DisplayName("testSelectById") public void testSelectById () { User user = userMapper.selectById(3L ); System.out.println(user); }
根据 多个ID 查询 多个用户信息 1 2 3 4 5 6 7 8 @Test public void testSelectBatchIds () { List<Long> list = Arrays.asListƑL, 2L , 3L ); List<User> users = userMapper.selectBatchIds(list); users.forEach(System.out::println); }
通过 map 条件查询 用户信息 1 2 3 4 5 6 7 8 9 10 @Test public void testSelectByMap () { Map<String, Object> map = new HashMap <>(); map.put("name" , "Jack" ); map.put("age" , 18 ); List<User> users = userMapper.selectByMap(map); users.forEach(System.out::println); }
查询所有数据 1 2 3 4 5 6 7 @Test public void testSelectList () { List<User> users = userMapper.selectList(null ); users.forEach(System.out::println); }
通过测试 BaseMapper 中的方法,大多方法中都有 Wrapper 类型的形参,此为 条件构造器,可针对于 SQL 语句 设置不同的条件,若没有条件,则可以为 该形参赋值为 null,即查询(删除、修改)所有数据
自定义功能 UserMapper.java 1 2 Map<String,Object> selectMapById (Long id) ;
UserMapper.xml 1 2 3 4 <select id ="selectMapById" resultType ="map" > select id,name,age,email from t_user where id = #{id} </select >
test 1 2 3 4 5 @Test public void testConsumer () { Map<String, Object> map = userMapper.selectMapById(1L ); System.out.println("map = " + map); }
通用 Service
通用 Service CRUD 封装IService 接口,进一步封装 CRUD 采用 get 查询单行 remove 删
除 list 查询集合 page 分页 前缀命名方式区分 Mapper 层避免混淆,
泛型 T 为任意实体对象
建议如果存在自定义通用 Service 方法的可能,请创建自己的 IBaseService 继承
Mybatis-Plus 提供的基类
官网地址
IService MyBatis-Plus 中有一个 接口 IService 和 其 实现类 ServiceImpl ,封装了常见的业务层逻辑,详情查看源码 IService 和 ServiceImpl
创建 Service 接口 和 实现类 1 2 3 4 5 6 7 8 9 10 11 12 13 14 public interface UserService extends IService <User> {} @Service public class UserServiceImpl extends ServiceImpl <UserMapper, User> implements UserService {}
Service 接口 接口 UserService 继承 IService 模板提供的基础功能
实现类 ServiceImpl实现了IService,提供了IService中基础功能的实现。若ServiceImpl无法满足业务需求,则可以使用自定的UserService定义方法,并在实现类中实现
测试查询记录 1 2 3 4 5 6 7 8 9 10 11 12 @Autowired private UserService userService;@Test public void testGetCount () { long count = userService.count(); System.out.println("总记录数 = " + count); }
测试批量插入 1 2 3 4 5 6 7 8 9 10 11 12 13 14 15 16 17 @Test public void testInsertMore () { List<User> users = new ArrayList <>(); for (int i = 1 ; i <= 10 ; i++) { User user = new User (); user.setName("lxg" + i); user.setAge(20 + i); users.add(user); } boolean b = userService.saveBatch(users); System.out.println(b); }
常见注解 @TableName
经过以上测试,在使用 MyBatis-Plus 实现基本 CRUD 时,我们并没有指定要 操作的表,只是在 Mapper 接口 继承 BaseMapper 时,设置了 泛型 User,而操作 的 表为 user 表
由此 得出结论,MyBatis-Plus 在 确定操作的表时,由 BaseMapper 的泛型决定,即 实体类型决定,且默认操作的表名和实体类型 的类名一致
问题 若 实体类类型的类名和要操作的表的表名不一致,会抛出异常
Cause: com.mysql.jdbc.exceptions.jdbc8.MySQLSyntaxErrorException : Table ‘xxx’ doesn’t exist
通过 @TableName 解决 在 实体类 类型上添加 @TableName("t_user")
通过全局配置解决问题
在开发过程中,会遇到 实体类所对应的表有固定前缀,例如 t_
此时,可以使用 MyBatis-Plus 提供的全局配置 ,为实体类所对应的表名设置默认的前缀,那么就不需要在每个实体类上通过 @TableName 标识 实体类对应的表
1 2 3 4 5 6 7 8 9 mybatis-plus: configuration: log-impl: org.apache.ibatis.logging.stdout.StdOutImpl global-config: db-config: table-prefix: t_
@TableId
经过以上的测试 ,MyBatis-Plus 在实现 CRUD 时,会默认将 ID 作为 主键列
问题
若 实体类和表中表示主键的 不是 ID,而是其他字段,例如 uid,MyBatis-Plus 会自动识别 uid 为主键列吗
-> 程序 抛出异常 Filed uid doesn’t have a default value
通过 @TableId 解决 问题
在 实体类中 uid 属性上通过 @TableId 将其作为 主键,即可成功执行 SQL 语句
@TableId 的 value 属性
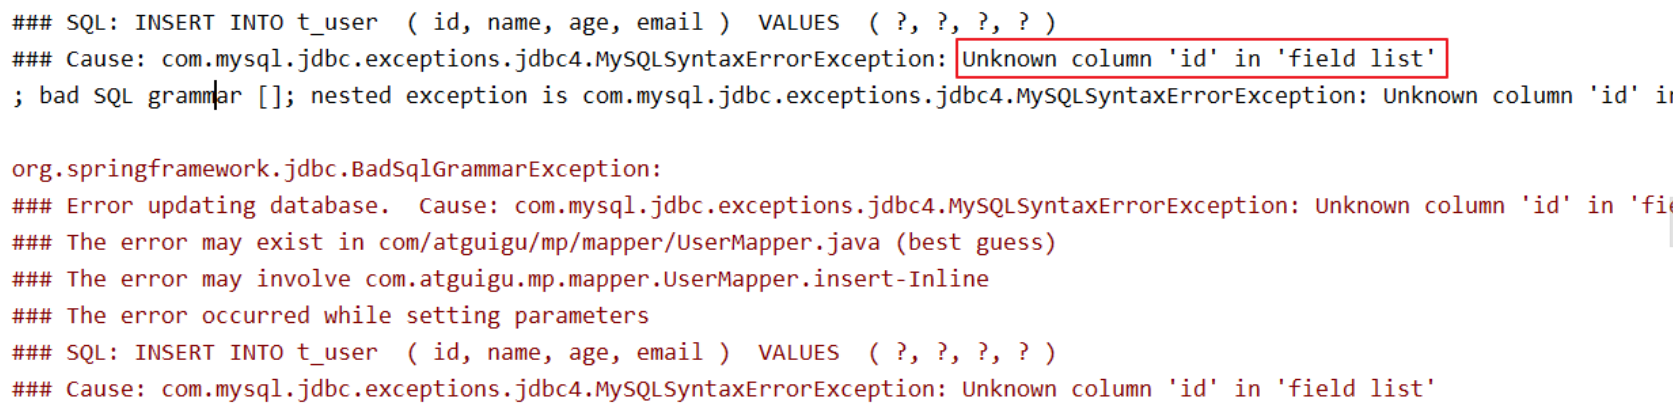
若实体类中主键对应的属性为id,而表中表示主键的字段为uid,此时若只在属性id上添加注解
@TableId ,则抛出异常Unknown column ‘id’ in ‘field list’ ,即MyBatis-Plus仍然会将id作为表的
主键操作,而表中表示主键的是字段uid
此时需要通过**@TableId注解的value属性,指定表中的主键字段**,@TableId(“uid”)或
@TableId(value=”uid”)
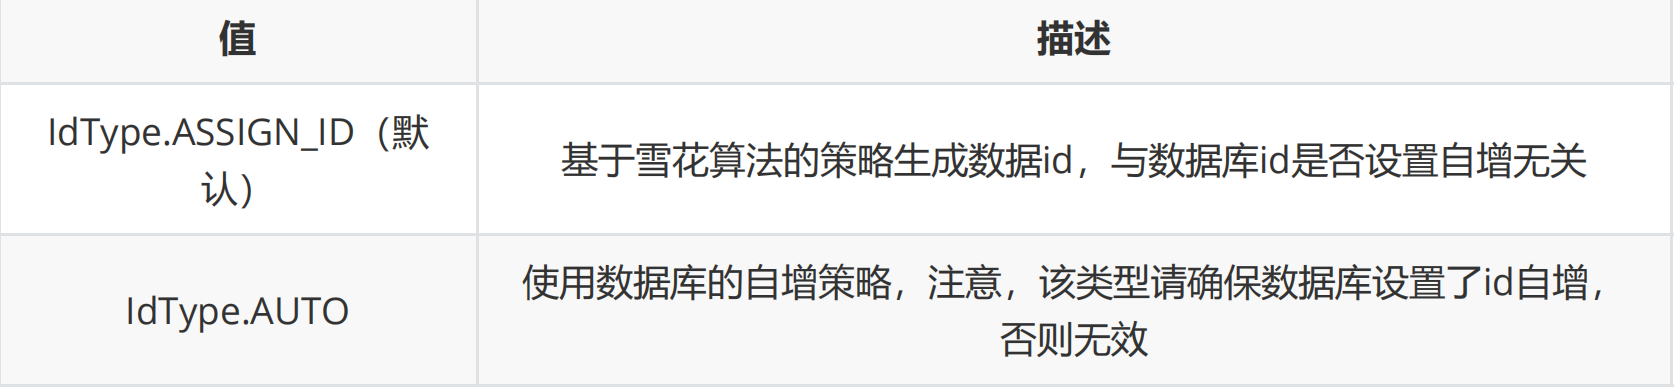
@TableId 的 type 属性
type 属性 用来定义 主键策略
常用的主键策略 配置全局主键策略 1 2 3 4 5 6 7 8 9 10 11 mybatis-plus: configuration: log-impl: org.apache.ibatis.logging.stdout.StdOutImpl global-config: db-config: table-prefix: t_ id-type: auto
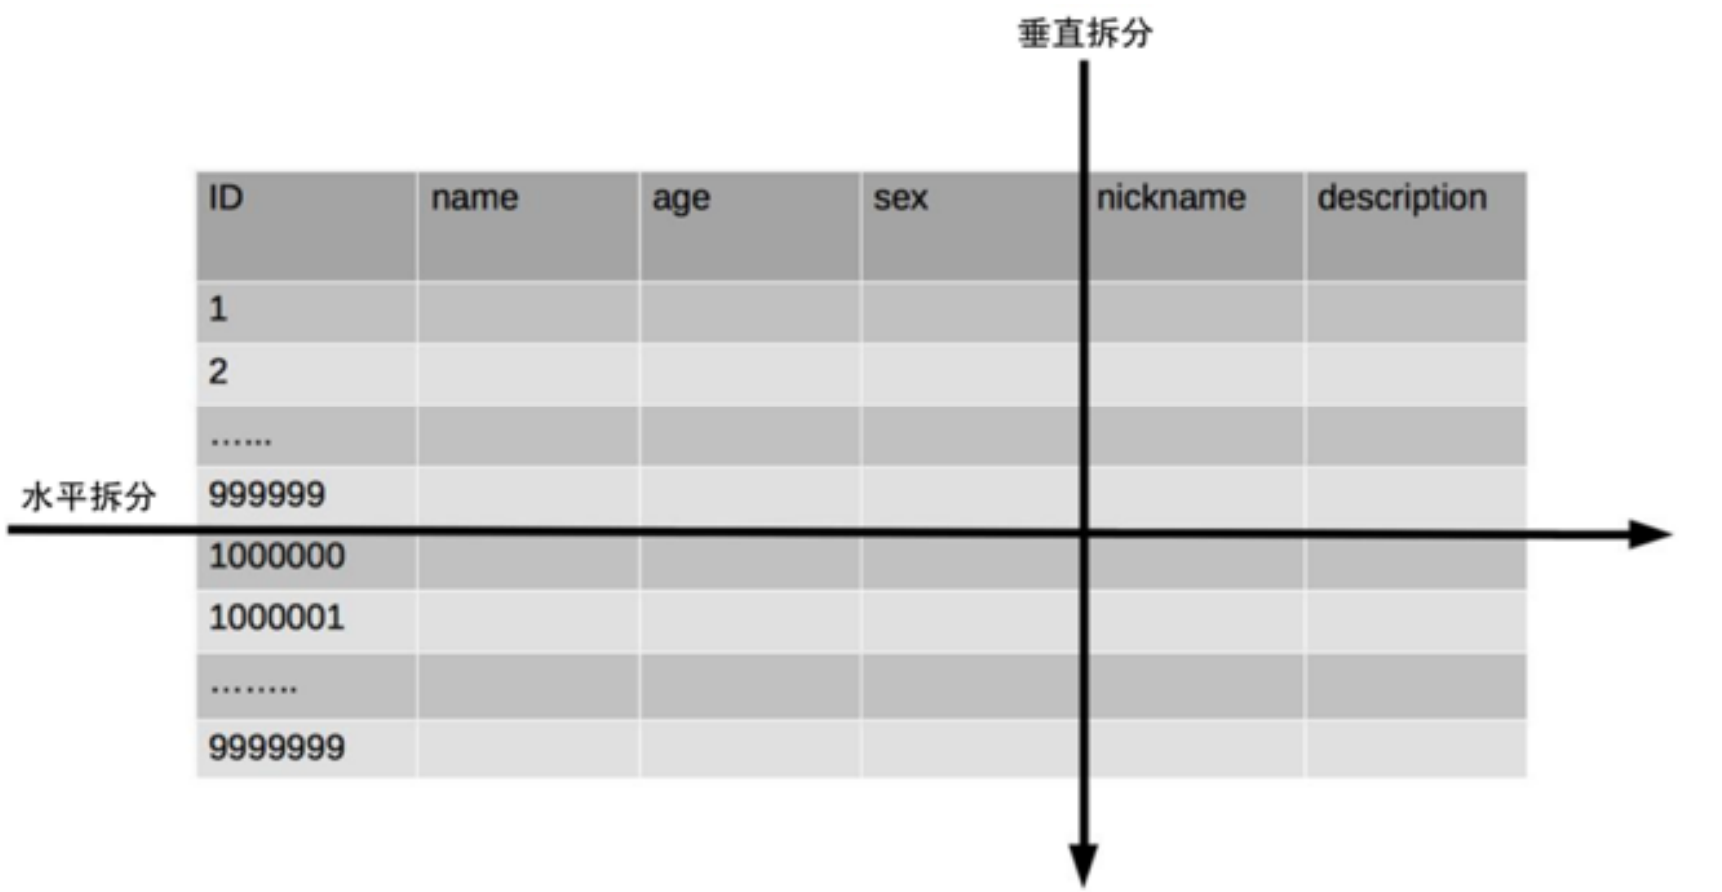
雪花算法 背景 需要选择合适的方案去应对数据规模的增长,以应对逐渐增长的访问压力和数据量 。
数据库的扩展方式主要包括:业务分库、主从复制,数据库分表。
数据库分表 将不同业务数据分散存储到不同的数据库服务器,能够支撑百万甚至千万用户规模的业务,但如果业务
继续发展,同一业务的单表数据也会达到单台数据库服务器的处理瓶颈。例如,淘宝的几亿用户数据,
如果全部存放在一台数据库服务器的一张表中,肯定是无法满足性能要求的,此时就需要对单表数据进
行拆分。
单表数据拆分有两种方式:垂直分表和水平分表 。示意图如下:
垂直分表
垂直分表适合将表中某些不常用且占了大量空间的列拆分出去。
例如,前面示意图中的 nickname 和 description 字段,假设我们是一个婚恋网站,用户在筛选其他用
户的时候,主要是用 age 和 sex 两个字段进行查询,而 nickname 和 description 两个字段主要用于展
示,一般不会在业务查询中用到。description 本身又比较长,因此我们可以将这两个字段独立到另外
一张表中,这样在查询 age 和 sex 时,就能带来一定的性能提升。
水平分表
水平分表适合表行数特别大的表,有的公司要求单表行数超过 5000 万就必须进行分表,这个数字可以
作为参考,但并不是绝对标准,关键还是要看表的访问性能。对于一些比较复杂的表,可能超过 1000
万就要分表了;而对于一些简单的表,即使存储数据超过 1 亿行,也可以不分表。
但不管怎样,当看到表的数据量达到千万级别时,作为架构师就要警觉起来,因为这很可能是架构的性
能瓶颈或者隐患。
水平分表相比垂直分表,会引入更多的复杂性,例如要求全局唯一的数据id该如何处
主键自增
①以最常见的用户 ID 为例,可以按照 1000000 的范围大小进行分段,1 ~ 999999 放到表 1中,
1000000 ~ 1999999 放到表2中,以此类推。
②复杂点 :分段大小的选取。分段太小会导致切分后子表数量过多,增加维护复杂度;分段太大可能会
导致单表依然存在性能问题,一般建议分段大小在 100 万至 2000 万之间,具体需要根据业务选取合适
的分段大小。
③优点 :可以随着数据的增加平滑地扩充新的表。例如,现在的用户是 100 万,如果增加到 1000 万,
只需要增加新的表就可以了,原有的数据不需要动。
④缺点 :分布不均匀。假如按照 1000 万来进行分表,有可能某个分段实际存储的数据量只有 1 条,而
另外一个分段实际存储的数据量有 1000 万条。
取模
①同样以用户 ID 为例,假如我们一开始就规划了 10 个数据库表,可以简单地用 user_id % 10 的值来
表示数据所属的数据库表编号,ID 为 985 的用户放到编号为 5 的子表中,ID 为 10086 的用户放到编号
为 6 的子表中。
②复杂点 :初始表数量的确定。表数量太多维护比较麻烦,表数量太少又可能导致单表性能存在问题。
③优点 :表分布比较均匀。
④缺点 :扩充新的表很麻烦,所有数据都要重分布。
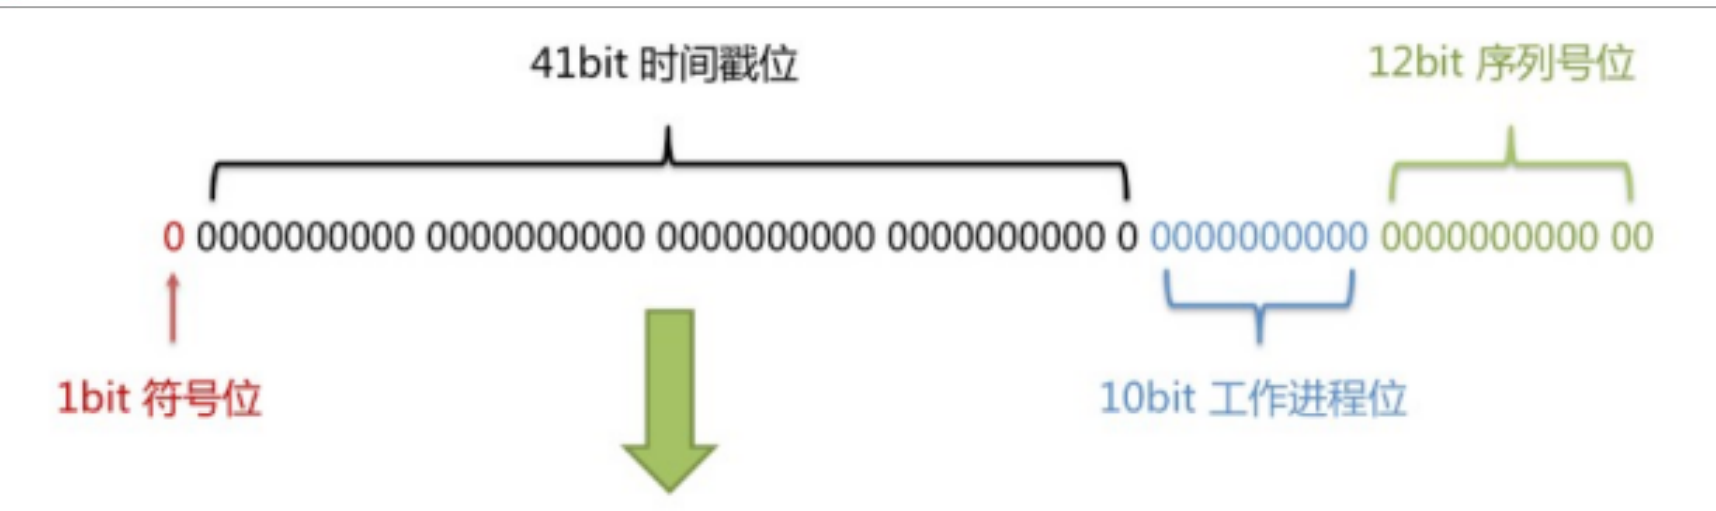
雪花算法
雪花算法是由Twitter公布的分布式主键生成算法,它能够保证不同表的主键的不重复性,以及相同表的
主键的有序性。
①核心思想:
长度共64bit(一个long型)。
首先是一个符号位,1bit标识,由于long基本类型在Java中是带符号的,最高位是符号位,正数是0,负
数是1,所以id一般是正数,最高位是0。
41bit时间截(毫秒级),存储的是时间截的差值(当前时间截 - 开始时间截),结果约等于69.73年。
10bit作为机器的ID(
5个bit是数据中心,5个bit的机器ID,可以部署在1024个节点)。
12bit作为毫秒内的流水号(意味着每个节点在每毫秒可以产生 4096 个 ID)。
②优点 :整体上按照时间自增排序,并且整个分布式系统内不会产生ID碰撞,并且效率较高。
@TableField
通过以上的测试,我们可以发现,MyBatis-Plus 在执行 SQL 语句时,要保证 实体类中的属性和表中的字段名一致
如果 实体类中的属性名和字段名属性不一致的情况 ,会出现什么情况
情况 1 若实体类中的属性使用的是驼峰命名风格,而表中的字段使用的是下划线命名风格
例如实体类属性userName,表中字段user_name
此时 MyBatis-Plus 会自动将下划线命名风格转化为 驼峰命名规则
相当于在MyBatis中配置
情况 2 若实体类中的属性和表中的字段不满足情况1
例如实体类属性name,表中字段username
此时需要在实体类属性上使用@TableField(“username”) 设置属性对应的字段名
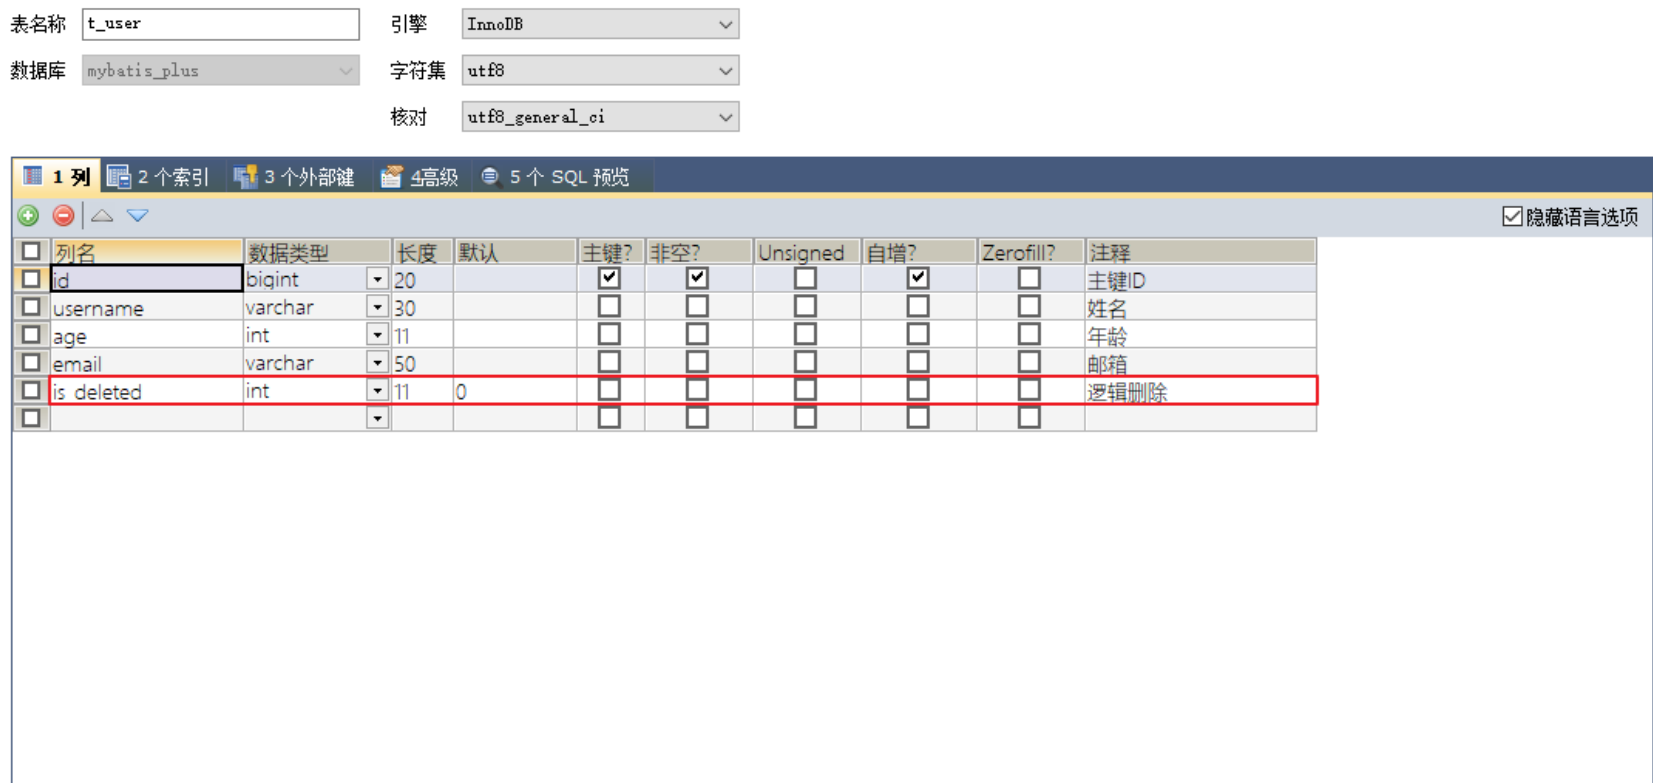
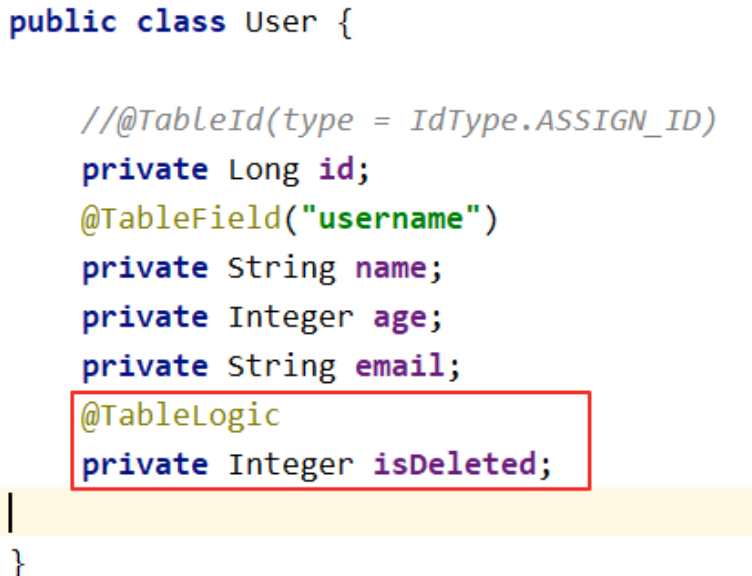
@TableLogic 逻辑删除
物理删除:真实删除,将对应数据从数据库中删除,之后查询不到此条被删除的数据
逻辑删除 :假删除,将对应数据中代表是否被删除字段的状态修改为“被删除状态” ,之后在数据库
中仍旧能看到此条数据记录
实现逻辑删除 step 1 数据库中创建 逻辑删除状态列,设置默认值为 0
step 2 实体类中添加 逻辑删除属性
step 3 测试删除功能,真正执行的是修改
UPDATE t_user SET is_deleted=1 WHERE id=? AND is_deleted=0
测试查询功能,被逻辑删除的数据默认不会被查询
SELECT id,username AS name,age,email,is_deleted FROM t_user WHERE is_deleted=0
条件构造器 和 常用 接口 wrapper 介绍
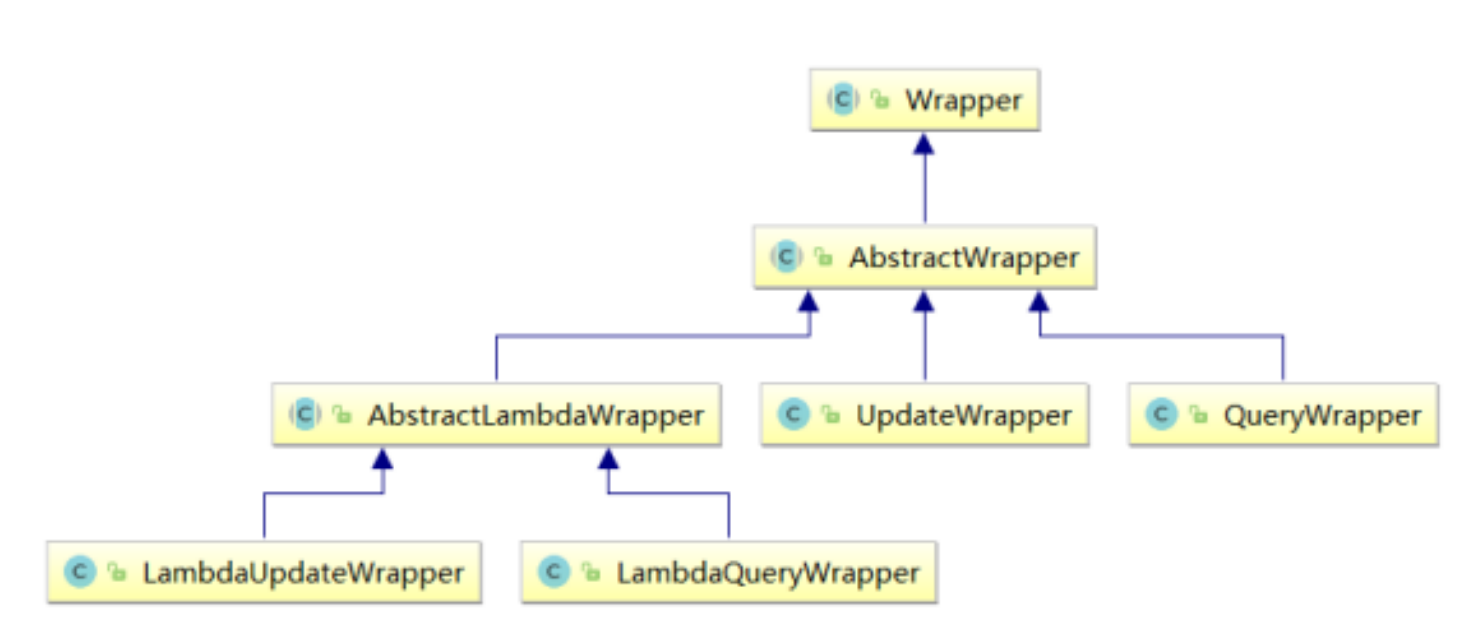
Wrapper : 条件构造抽象类
AbstractWrapper : 用于 查询条件封装,生成 SQL 的 where 条件
QueryWrapper : 查询条件封装
UpdateWrapper : Update 条件封装
AbstractLambdaWrapper : 使用 Lambda 语法
LambdaQueryWrapper : 用于 使用 Lambda 语法使用 的查询 Wrapper
LambdaUpdateWrapper : Lambda 更新封装Wrapper
QueryWrapper 组装查询条件 1 2 3 4 5 6 7 8 9 10 11 12 13 14 15 @Test public void test01 () { QueryWrapper<User> queryWrapper = new QueryWrapper <>(); queryWrapper.like("user_name" , "a" ) .between("age" , 20 , 30 ) .isNotNull("email" ); List<User> users = userMapper.selectList(queryWrapper); users.forEach(System.out::println); }
组装排序条件 1 2 3 4 5 6 7 8 9 10 11 12 13 @Test public void test02 () { QueryWrapper<User> queryWrapper = new QueryWrapper <>(); queryWrapper.orderByDesc("age" ) .orderByAsc("uid" ); List<User> users = userMapper.selectList(queryWrapper); users.forEach(System.out::println); }
组装删除条件 1 2 3 4 5 6 7 8 9 10 11 @Test public void test03 () { QueryWrapper<User> queryWrapper = new QueryWrapper <>(); queryWrapper.isNull("email" ); int result = userMapper.delete(queryWrapper); System.out.println("result = " + result); }
条件的优先级 1 2 3 4 5 6 7 8 9 10 11 12 13 14 15 16 17 18 19 20 21 22 23 24 25 26 27 28 29 30 31 32 33 34 35 36 @Test public void test04 () { QueryWrapper<User> queryWrapper = new QueryWrapper <>(); queryWrapper.gt("age" , 20 ) .like("user_name" , "a" ) .or() .isNotNull("email" ); User user = new User (); user.setName("小明" ); user.setEmail("test@atguigu.com" ); int result = userMapper.update(user, queryWrapper); System.out.println("result = " + result); } @Test public void test05 () { QueryWrapper<User> queryWrapper = new QueryWrapper <>(); queryWrapper.like("user_name" , "a" ) .and(i -> i.gt("age" , 20 ).or().isNull("email" )); User user = new User (); user.setName("小红" ); user.setEmail("test@atguigu.com" ); int result = userMapper.update(user, queryWrapper); System.out.println("result = " + result); }
组装 select 子句 1 2 3 4 5 6 7 8 9 10 11 @Test public void test06 () { QueryWrapper<User> queryWrapper = new QueryWrapper <>(); queryWrapper.select("user_name" , "age" , "email" ); List<Map<String, Object>> users = userMapper.selectMaps(queryWrapper); users.forEach(System.out::println); }
实现子查询 1 2 3 4 5 6 7 8 9 10 11 12 @Test public void test07 () { QueryWrapper<User> queryWrapper = new QueryWrapper <>(); queryWrapper.inSql("uid" , "select uid from t_user where uid <= 100" ); List<User> list = userMapper.selectList(queryWrapper); list.forEach(System.out::println); }
UpdateWrapper 1 2 3 4 5 6 7 8 9 10 11 12 13 14 15 @Test public void test08 () { UpdateWrapper<User> updateWrapper = new UpdateWrapper <>(); updateWrapper.like("user_name" , "a" ) .and(i -> i.gt("age" , 20 ).or().isNull("email" )); updateWrapper.set("user_name" , "小黑" ).set("email" , "abc@atguigu.com" ); int result = userMapper.update(null , updateWrapper); System.out.println("result = " + result); }
Condition
在真正开发的过程中,组装条件是常见的功能, 而这些条件来源于用户输入,是可选的,因此我们在组装这些条件的时候,必须要先判断用户是否选择了这些条件, 若选择则需要组装该条件,若没有选择则一定不能组装,以免影响 SQL 执行的结果
思路一 1 2 3 4 5 6 7 8 9 10 11 12 13 14 15 16 17 18 19 20 21 22 23 24 @Test public void test09 () { String username = "a" ; Integer ageBegin = null ; Integer ageEnd = 30 ; QueryWrapper<User> queryWrapper = new QueryWrapper <>(); if (StringUtils.isNotBlank(username)) { queryWrapper.like("user_name" , username); } if (ageBegin != null ) { queryWrapper.gt("age" , ageBegin); } if (ageEnd != null ) { queryWrapper.le("age" , ageEnd); } List<User> list = userMapper.selectList(queryWrapper); list.forEach(System.out::println); }
思路二
上面的实现方案没有问题,但是代码比较复杂,我们可以使用带 condition 参数的重载方法构建查询条件, 简化代码的编写
1 2 3 4 5 6 7 8 9 10 11 12 13 14 15 16 17 @Test public void test10 () { String username = "a" ; Integer ageBegin = null ; Integer ageEnd = 30 ; QueryWrapper<User> queryWrapper = new QueryWrapper <>(); queryWrapper.like(StringUtils.isNotBlank(username), "user_name" , username) .gt(ageBegin != null , "age" , ageBegin) .le(ageEnd != null , "age" , ageEnd); List<User> list = userMapper.selectList(queryWrapper); list.forEach(System.out::println); }
LambdaQueryWrapper 1 2 3 4 5 6 7 8 9 10 11 12 13 14 15 16 17 18 19 @Test public void test11 () { String username = "a" ; Integer ageBegin = null ; Integer ageEnd = 30 ; LambdaQueryWrapper<User> queryWrapper = new LambdaQueryWrapper <>(); queryWrapper.like(StringUtils.isNotBlank(username), User::getName, username) .gt(ageBegin != null , User::getAge, ageBegin) .le(ageEnd != null , User::getAge, ageEnd); List<User> list = userMapper.selectList(queryWrapper); list.forEach(System.out::println); }
LambdaUpdateWrapper 1 2 3 4 5 6 7 8 9 10 11 12 13 14 15 @Test public void test12 () { LambdaUpdateWrapper<User> updateWrapper = new LambdaUpdateWrapper <>(); updateWrapper.like(User::getName, "a" ) .and(i -> i.gt(User::getAge, 20 ).or().isNull(User::getEmail)); updateWrapper.set(User::getName, "小黑" ).set(User::getEmail, "abc@atguigu.com" ); int result = userMapper.update(null , updateWrapper); System.out.println("result = " + result); }
插件 分页插件
MyBatis-Plus 自带分页插件,只要简单的配置即可实现分页功能
添加配置类 1 2 3 4 5 6 7 8 9 10 11 12 13 14 15 16 17 18 19 @Configuration @MapperScan("scan.your.mapper.package") public class MybatisPlusConfig { @Bean public MybatisPlusInterceptor mybatisPlusInterceptor () { MybatisPlusInterceptor interceptor = new MybatisPlusInterceptor (); interceptor.addInnerInterceptor(new PaginationInnerInterceptor (DbType.H2)); return interceptor; } @Bean public ConfigurationCustomizer configurationCustomizer () { return configuration -> configuration.setUseDeprecatedExecutor(false ); } }
新的分页插件,一缓和二缓遵循mybatis的规则,需要设置 MybatisConfiguration#useDeprecatedExecutor = false 避免缓存出现问题(该属性会在旧插件移除后一同移除)
测试 1 2 3 4 5 6 7 8 9 10 11 12 13 14 15 16 17 18 19 @Autowired private ProductMapper productMapper;@Test @DisplayName("PagePlugin") public void testPage () { Page<User> page = new Page <>(1 , 3 ); userMapper.selectPage(page, null ); System.out.println( page.getRecords()); System.out.println("总页数:" + page.getPages()); System.out.println("总记录数" + page.getTotal()); System.out.println("是否有上一页" + page.hasNext()); System.out.println("是否有下一页:" + page.hasPrevious()); }
xml 自定义分页 UserMapper 中定义接口方法 1 2 3 4 5 6 Page<User> selectPageVo (@Param("page") Page<User> page, @Param("age") Integer age) ;
UserMapper.xml 中编写 SQL 1 2 3 4 <select id ="selectPageVo" resultType ="User" > select uid as `id`,user_name as `name`,age,email from t_user where age > #{age} </select >
测试 1 2 3 4 5 6 7 8 9 10 11 12 13 14 @Test public void testSelectPageVo () { Page<User> page = new Page <>(1 , 5 ); userMapper.selectPageVo(page, 20 ); List<User> list = page.getRecords(); list.forEach(System.out::println); System.out.println("当前页:" +page.getCurrent()); System.out.println("每页显示的条数:" +page.getSize()); System.out.println("总记录数:" +page.getTotal()); System.out.println("总页数:" +page.getPages()); System.out.println("是否有上一页:" +page.hasPrevious()); System.out.println("是否有下一页:" +page.hasNext()); }
乐观锁 场景 一件商品,成本价是80元,售价是100元。老板先是通知小李,说你去把商品价格增加50元。小
李正在玩游戏,耽搁了一个小时。正好一个小时后,老板觉得商品价格增加到150元,价格太
高,可能会影响销量。又通知小王,你把商品价格降低30元。
此时,小李和小王同时操作商品后台系统。小李操作的时候,系统先取出商品价格100元;小王
也在操作,取出的商品价格也是100元。小李将价格加了50元,并将100+50=150元存入了数据
库;小王将商品减了30元,并将100-30=70元存入了数据库。是的,如果没有锁,小李的操作就
完全被小王的覆盖了。
现在商品价格是70元,比成本价低10元。几分钟后,这个商品很快出售了1千多件商品,老板亏1
万多
乐观锁和悲观锁 上面的故事,如果是乐观锁,小王保存价格前,会检查下价格是否被人修改过了。如果被修改过了,则重新取出的被修改后的价格,150元,这样他会将120元存入数据库。
如果是悲观锁,小李取出数据后,小王只能等小李操作完之后,才能对价格进行操作,也会保证
最终的价格是120元。
模拟修改冲突 数据库中增加商品表 1 2 3 4 5 6 CREATE TABLE t_product( id BIGINT (20 ) NOT NULL COMMENT '主键ID' , NAME VARCHAR (30 ) NULL DEFAULT NULL COMMENT '商品名称' , price INT (11 ) DEFAULT 0 COMMENT '价格' , VERSION INT (11 ) DEFAULT 0 COMMENT '乐观锁版本号' , PRIMARY KEY (id) );
添加数据 1 INSERT INTO t_product (id, NAME, price) VALUES (1 , '外星人笔记本' , 100 );
添加实体 1 2 3 4 5 6 7 8 9 10 11 package com.cs7eric.mybatisplus.entity;import lombok.Data;@Data public class Product { private Long id; private String name; private Integer price; private Integer version; }
添加 mapper 1 2 3 @Repository public interface ProductMapper extends BaseMapper <Product> {}
测试 1 2 3 4 5 6 7 8 9 10 11 12 13 14 15 16 17 18 19 20 21 22 @Test public void testProduct01 () { Product productLi = productMapper.selectById(1 ); System.out.println("小李查询的商品价格:" + productLi.getPrice()); Product productWang = productMapper.selectById(1 ); System.out.println("小王查询的商品价格:" + productWang.getPrice()); productLi.setPrice(productLi.getPrice() + 50 ); productMapper.updateById(productLi); productWang.setPrice(productWang.getPrice() - 30 ); int result = productMapper.updateById(productWang); Product productBoss = productMapper.selectById(1 ); System.out.println("老板查询的商品价格:" + productBoss.getPrice()); }
乐观锁实现流程
数据库中添加 version 字段
取出记录时,获取当前的 version
1 SELECT id,`name`,price,`version` FROM product WHERE id= 1
更新时,version + 1,如果 where 语句中的 version 版本不对,则更新失败
1 2 UPDATE product SET price= price+ 50 , `version`= `version` + 1 WHERE id= 1 AND `version`= 1
MyBatis-Plus 实现乐观锁 修改实体类 1 2 3 4 5 6 7 8 9 10 @Data public class Product { private Long id; private String name; private Integer price; @Version private Integer version; }
添加乐观锁插件配置 1 2 3 4 5 6 7 8 9 10 11 12 13 14 @Configuration @MapperScan("com.cs7eric.mybatisplus.mapper") public class MyBatisPlusConfig { @Bean public MybatisPlusInterceptor mybatisPlusInterceptor () { MybatisPlusInterceptor mybatisPlusInterceptor = new MybatisPlusInterceptor (); mybatisPlusInterceptor.addInnerInterceptor(new PaginationInnerInterceptor (DbType.MYSQL)); mybatisPlusInterceptor.addInnerInterceptor(new OptimisticLockerInnerInterceptor ()); return mybatisPlusInterceptor; }
测试修改冲突
小李查询商品信息:
SELECT id,name,price,version FROM t_product WHERE id=?
小王查询商品信息:
SELECT id,name,price,version FROM t_product WHERE id=?
小李修改商品价格,自动将version+1
UPDATE t_product SET name=?, price=?, version=? WHERE id=? AND version=? Parameters: 外星人笔记本(String), 150(Integer), 1(Integer), 1(Long), 0(Integer)
小王修改商品价格,此时version已更新,条件不成立,修改失败
UPDATE t_product SET name=?, price=?, version=? WHERE id=? AND version=? Parameters: 外星人笔记本(String), 70(Integer), 1(Integer), 1(Long), 0(Integer)
最终,小王修改失败,查询价格:150
SELECT id,name,price,version FROM t_product WHERE id=?
优化流程 1 2 3 4 5 6 7 8 9 10 11 12 13 14 15 16 17 18 19 20 21 22 23 24 25 26 27 28 @Test public void testProduct01 () { Product productLi = productMapper.selectById(1 ); System.out.println("小李查询的商品价格:" + productLi.getPrice()); Product productWang = productMapper.selectById(1 ); System.out.println("小王查询的商品价格:" + productWang.getPrice()); productLi.setPrice(productLi.getPrice() + 50 ); productMapper.updateById(productLi); productWang.setPrice(productWang.getPrice() - 30 ); int result = productMapper.updateById(productWang); if (result == 0 ) { Product productNew = productMapper.selectById(1 ); productNew.setPrice(productNew.getPrice() - 30 ); productMapper.updateById(productNew); } Product productBoss = productMapper.selectById(1 ); System.out.println("老板查询的商品价格:" + productBoss.getPrice()); }
通用枚举
表中有些字段值是固定的,例如 性别,此时我们可以使用 MyBatis-Plus 的通用枚举来实现
数据库表添加字段 sex
创建通用枚举类型 1 2 3 4 5 6 7 8 9 10 11 12 13 14 15 16 17 18 19 20 21 22 23 24 25 26 27 28 29 30 31 32 33 package com.cs7eric.mybatisplus.enums;import lombok.Getter;@Getter public enum SexEnum { MALE(1 , "男" ), FEMALE(2 , "女" ); private final Integer sex; private final String sexName; SexEnum(Integer sex, String sexName) { this .sex = sex; this .sexName = sexName; } }
配置扫描通用枚举 type-enums-package: com.atguigu.mybatisplus.enums
该配置已弃用
测试 1 2 3 4 5 6 7 8 9 10 11 12 13 14 15 16 17 @SpringBootTest public class MyBatisPlusEnumTest { @Autowired private UserMapper userMapper; @Test public void test () { User user = new User (); user.setName("admin" ); user.setAge(33 ); user.setSex(SexEnum.MALE); int result = userMapper.insert(user); System.out.println("result = " + result); } }
代码生成器 引入依赖 1 2 3 4 5 6 7 8 9 10 <dependency > <groupId > com.baomidou</groupId > <artifactId > mybatis-plus-generator</artifactId > <version > 3.5.1</version > </dependency > <dependency > <groupId > org.freemarker</groupId > <artifactId > freemarker</artifactId > <version > 2.3.31</version > </dependency >
快速生成 1 2 3 4 5 6 7 8 9 10 11 12 13 14 15 16 17 18 19 20 21 22 23 24 25 26 27 28 29 30 31 32 33 34 35 package com.cs7eric.mybatisplus;import com.baomidou.mybatisplus.generator.FastAutoGenerator;import com.baomidou.mybatisplus.generator.config.OutputFile;import com.baomidou.mybatisplus.generator.engine.FreemarkerTemplateEngine;import org.springframework.boot.test.context.SpringBootTest;import java.util.Collections;public class FastAutoGenerateTest { public static void main (String[] args) { String path = "D://cache_repo//demo" ; FastAutoGenerator.create("jdbc:mysql://localhost:3306/sql_repo?serverTimezone=GMT%2B8&characterEncoding=utf-8&useSSL=false" , "root" , "C020611." ) .globalConfig(builder -> { builder.author("cs7eric" ) .fileOverride() .outputDir(path); }) .packageConfig(builder -> { builder.parent("com.cs7eric" ) .moduleName("mybatisplus" ) .pathInfo(Collections.singletonMap(OutputFile.mapperXml, path)); }) .strategyConfig(builder -> { }).templateEngine(new FreemarkerTemplateEngine ()) .execute(); } }
点击运行即可
多种数据源
适用于多种场景:纯粹多库、 读写分离、 一主多从、 混合模式等 目前我们就来模拟一个纯粹多库的一个场景,其他场景类似
场景说明:
我们创建两个库,分别为:mybatis_plus(以前的库不动)与mybatis_plus_1(新建),将 mybatis_plus库的product表移动到mybatis_plus_1库,这样每个库一张表,通过一个测试用例 分别获取用户数据与商品数据,如果获取到说明多库模拟成功
创建数据库
创建数据库 和 表
1 2 3 4 5 6 7 8 CREATE DATABASE `mybatis_plus_1` ;use `mybatis_plus_1`; CREATE TABLE product( id BIGINT (20 ) NOT NULL COMMENT '主键ID' , name VARCHAR (30 ) NULL DEFAULT NULL COMMENT '商品名称' , price INT (11 ) DEFAULT 0 COMMENT '价格' , version INT (11 ) DEFAULT 0 COMMENT '乐观锁版本号' , PRIMARY KEY (id) );
添加测试数据
1 INSERT INTO product (id, NAME, price) VALUES (1 , '外星人笔记本' , 100 );
引入依赖 1 2 3 4 5 6 7 8 9 10 11 12 13 14 15 16 17 18 19 20 21 22 23 24 25 26 <dependency > <groupId > com.baomidou</groupId > <artifactId > mybatis-plus-boot-starter</artifactId > <version > 3.5.1</version > </dependency > <dependency > <groupId > org.projectlombok</groupId > <artifactId > lombok</artifactId > <optional > true</optional > </dependency > <dependency > <groupId > mysql</groupId > <artifactId > mysql-connector-java</artifactId > </dependency > <dependency > <groupId > com.baomidou</groupId > <artifactId > dynamic-datasource-spring-boot-starter</artifactId > <version > 3.5.0</version > </dependency >
配置多数据源 1 2 3 4 5 6 7 8 9 10 11 12 13 14 15 16 17 18 19 20 spring: datasource: dynamic: primary: master strict: false datasource: master: url: jdbc:mysql://localhost:3306/mybatis_plus?serverTimezone=GMT%2B8&characterEncoding=utf-8&useSSL=false driver-class-name: com.mysql.cj.jdbc.Driver username: root password: 'C020611.' slave_1: url: jdbc:mysql://localhost:3306/mybatis_plus_1?serverTimezone=GMT%2B8&characterEncoding=utf-8&useSSL=false driver-class-name: com.mysql.cj.jdbc.Driver username: root password: 'C020611.'
创建用户Service 1 public interface UserService extends IService <User> {}
1 2 3 @Service @DS("master") public class UserServiceImpl extends ServiceImpl <UserMapper, User> implements UserService {}
创建商品service 1 public interface ProductService extends IService <Product> {}
1 2 3 @Service @DS("slave_1") public class ProductServiceImpl extends ServiceImpl <ProductMapper, Product> implements ProductService {}
测试 1 2 3 4 5 6 7 8 9 10 11 12 13 14 15 16 17 @SpringBootTest class MybatisPlusDatasourceApplicationTests { @Autowired private UserService userService; @Autowired private ProductService productService; @Test public void test () { System.out.println(userService.getById(1L )); System.out.println(productService.getById(1L )); } }
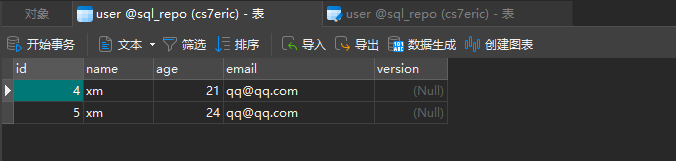
结果:
1、都能顺利获取对象,则测试成功
2、如果我们实现读写分离,将写操作方法加上主库数据源,读操作方法加上从库数据源,自动切换,是不是就能实现读写分离?
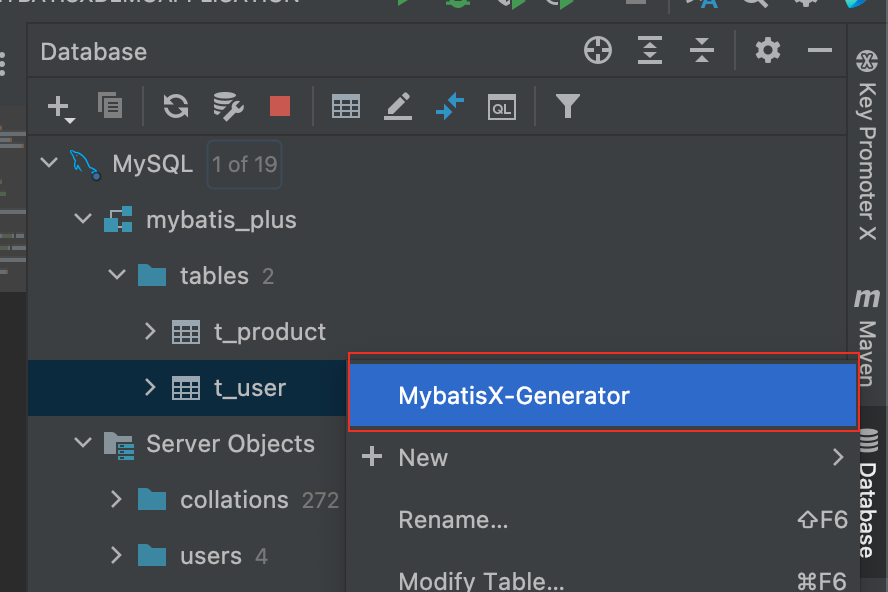
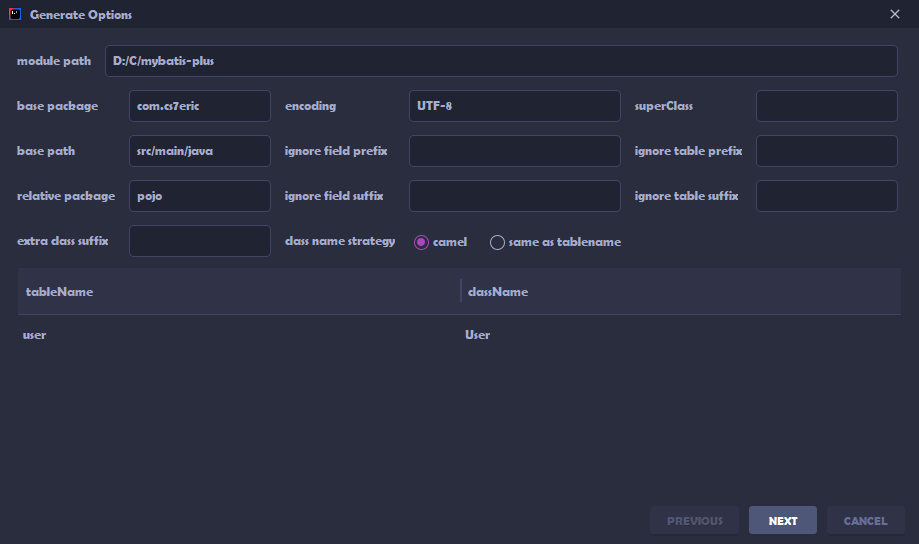
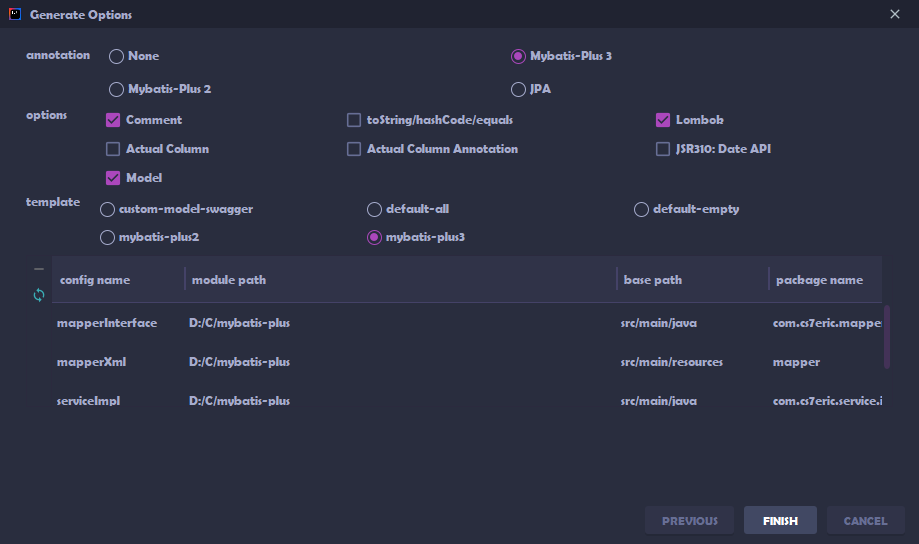
MyBatisX 插件
MyBatis-Plus为我们提供了强大的mapper和service模板,能够大大的提高开发效率
但是在真正开发过程中,MyBatis-Plus并不能为我们解决所有问题,例如一些复杂的SQL,多表 联查,我们就需要自己去编写代码和SQL语句,我们该如何快速的解决这个问题呢,这个时候可 以使用MyBatisX插件
MyBatisX一款基于 IDEA 的快速开发插件,为效率而生